Table of Contents
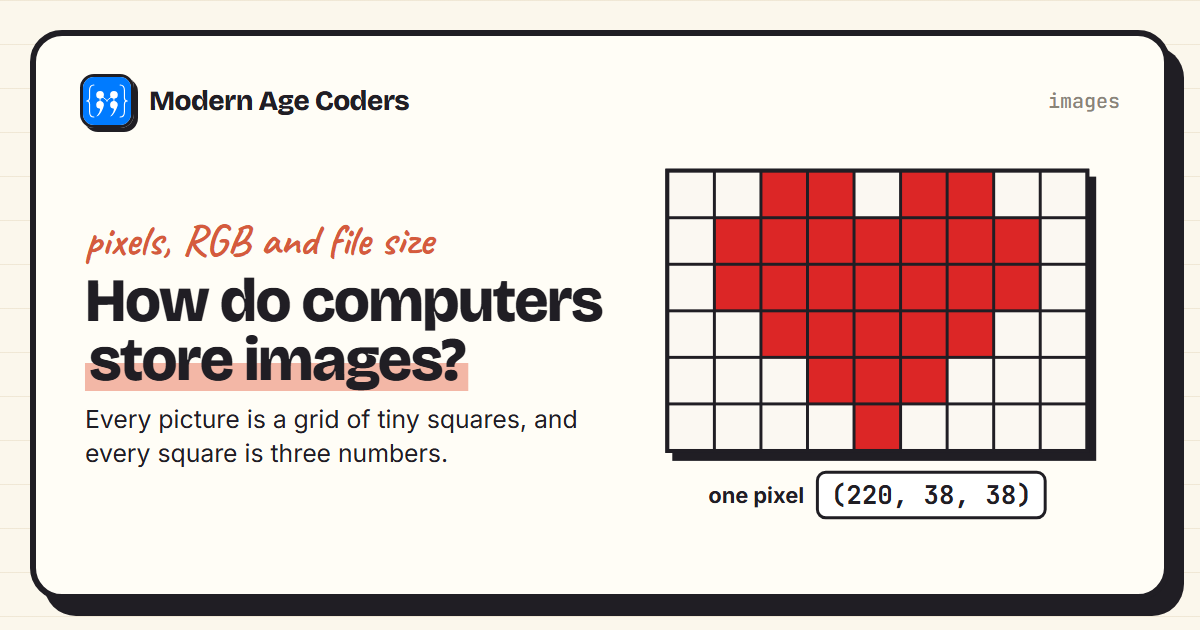
Every photo on your phone, every game sprite and every emoji is stored the same basic way: as a grid of tiny coloured squares called pixels, with each pixel saved as numbers. Understanding this explains a lot: why zooming in too far makes a picture blocky, why some image files are huge and others tiny, and how an app can turn a photo black and white in an instant.
This guide opens a real photo in Python and looks inside it, explains how three numbers make any colour, and measures how PNG and JPEG compression change the file size. The photo is the official US Navy portrait of Grace Hopper, the computing pioneer who helped create some of the first programming languages. It is in the public domain and comes bundled with the matplotlib library, so you can run every example yourself.
An image is a grid of pixels
A digital image is a rectangle of pixels arranged in rows and columns. Our photo is 512 pixels wide and 600 tall, which makes 307,200 pixels in total. Each one shows a single colour. From a normal distance your eyes blend them into a smooth picture. Zoom in far enough and the squares appear:
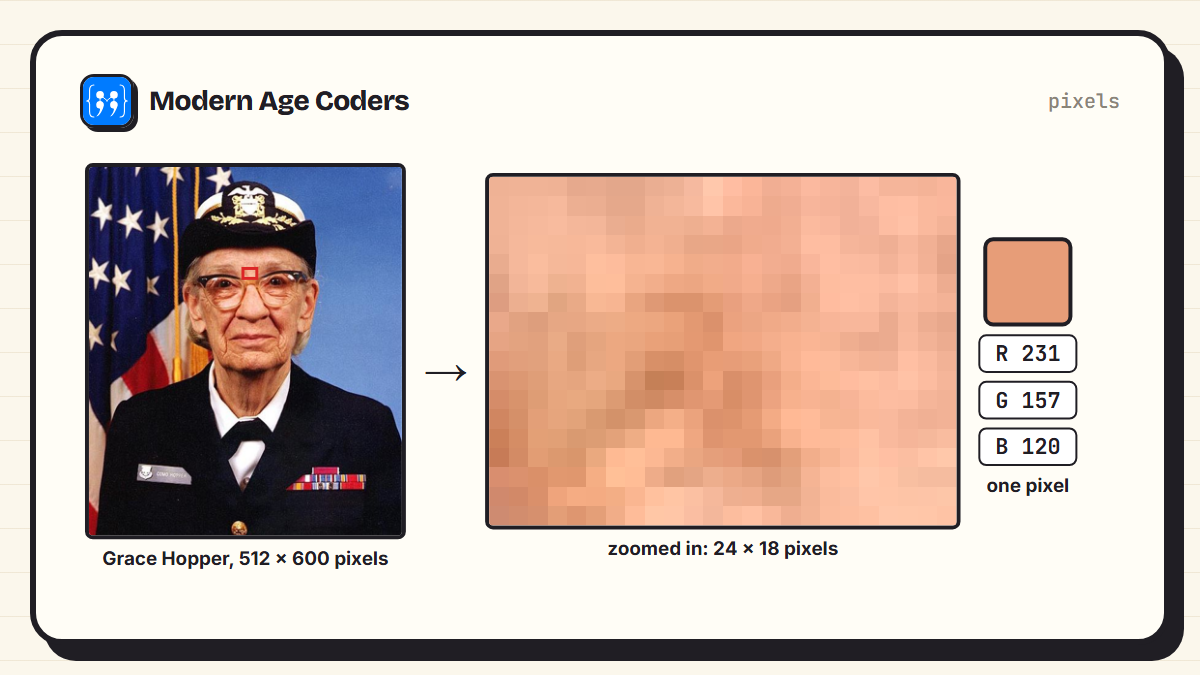
Here is how to read the size and individual pixels in Python with the Pillow library:
from PIL import Image
import matplotlib.cbook

path = matplotlib.cbook.get_sample_data("grace_hopper.jpg", asfileobj=False)
photo = Image.open(path).convert("RGB")

width, height = photo.size
print(f"size: {width} x {height} = {width * height:,} pixels")
print(f"raw size: {width * height * 3:,} bytes (3 bytes per pixel)")

for x, y in [(10, 10), (256, 170), (256, 560)]:
    r, g, b = photo.getpixel((x, y))
print(f"pixel ({x}, {y}): red {r}, green {g}, blue {b} hex #{r:02X}{g:02X}{b:02X}")size: 512 x 600 = 307,200 pixels
raw size: 921,600 bytes (3 bytes per pixel)
pixel (10, 10): red 13, green 14, blue 70 hex #0D0E46
pixel (256, 170): red 231, green 157, blue 120 hex #E79D78
pixel (256, 560): red 20, green 20, blue 22 hex #141416Pixel (10, 10), in the top-left corner, is in the flag and comes out dark blue. Pixel (256, 170) is on the face: red 231, green 157, blue 120. The coordinates count from the top-left corner, with y increasing downwards, which surprises many people used to maths graphs.
How three numbers make any colour
Screens make colour by mixing red, green and blue light. Each pixel stores how much of each, usually as a number from 0 (none) to 255 (full). That is one byte per colour, because 8 bits can hold 256 values. Three bytes per pixel gives 256 × 256 × 256, which is 16,777,216 possible colours.
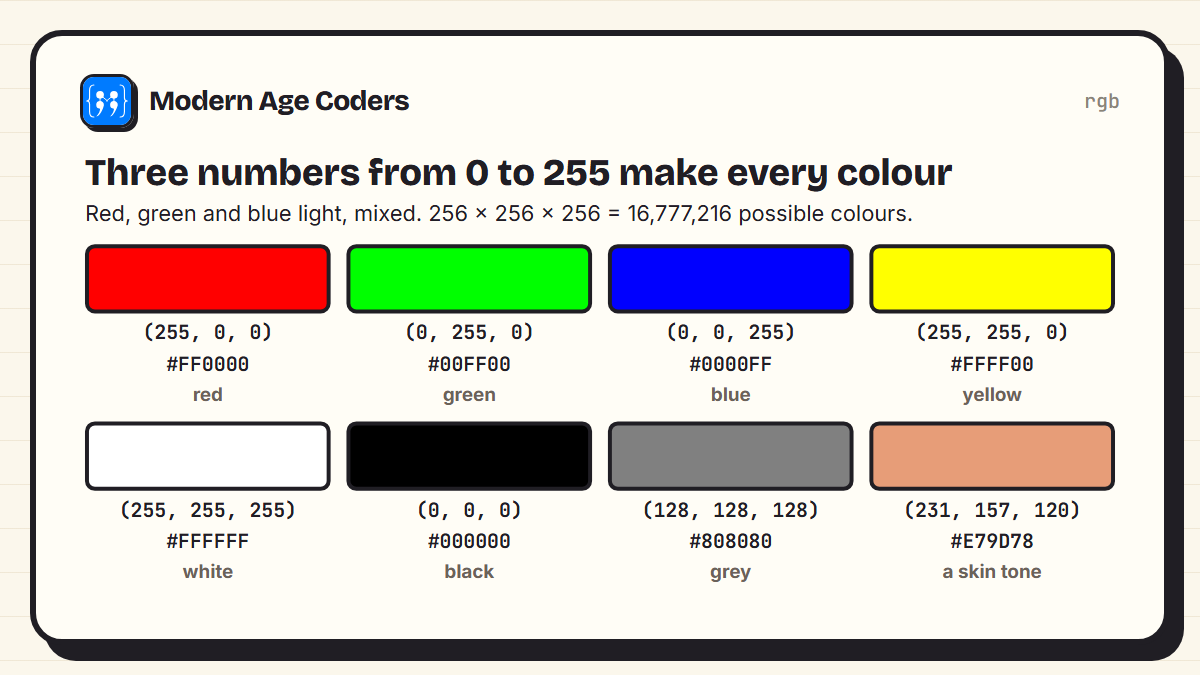
- (255, 0, 0) is pure red, (0, 255, 0) pure green and (0, 0, 255) pure blue.
- (255, 255, 0) is yellow. Red and green light together make yellow, which surprises anyone used to mixing paint.
- (255, 255, 255) is white (all light) and (0, 0, 0) is black (no light). Equal amounts of all three give a grey.
The same colours are often written as hex codes in web design, such as #FF0000 for red. Each pair of hex digits is one of the three numbers written in base 16: FF is 255. If you have written CSS, you have been writing pixel colours all along. Our HTML, CSS and JavaScript project ideas use them throughout.
Turning a photo black and white
To make a colour pixel grey, you replace it with one brightness value. The obvious approach, averaging the three numbers, looks slightly wrong, because our eyes are much more sensitive to green than to blue. The standard formula weights them differently, and it is the one Pillow's own documentation gives for converting to greyscale:
from PIL import Image
import matplotlib.cbook

photo = Image.open(matplotlib.cbook.get_sample_data("grace_hopper.jpg", asfileobj=False)).convert("RGB")
r, g, b = photo.getpixel((256, 170))

# Our eyes are most sensitive to green and least to blue, so the weights differ
by_hand = round((r * 299 + g * 587 + b * 114) / 1000)
by_pillow = photo.convert("L").getpixel((256, 170))
print(f"colour ({r}, {g}, {b}) -> grey {by_hand} by hand, {by_pillow} by Pillow")
print(f"plain average would give {(r + g + b) // 3}")colour (231, 157, 120) -> grey 175 by hand, 175 by Pillow
plain average would give 169The weighted formula gives 175, exactly matching Pillow. A plain average would have given 169, a slightly darker grey for this skin tone. Every photo filter on your phone is doing arithmetic like this on every pixel, millions of times, in a fraction of a second.
Why image files are different sizes
Stored raw, every pixel takes 3 bytes, so our photo needs 921,600 bytes, and a 12-megapixel phone photo would need about 36 million. That is why images are almost always compressed. We saved the photo, and a flat graphic of the same size made of a few solid shapes, in different formats and measured the results:
import io
from PIL import Image, ImageDraw
import matplotlib.cbook

photo = Image.open(matplotlib.cbook.get_sample_data("grace_hopper.jpg", asfileobj=False)).convert("RGB")

# A flat graphic the same size: a few solid shapes, like a logo or diagram
graphic = Image.new("RGB", photo.size, (251, 248, 242))
draw = ImageDraw.Draw(graphic)
draw.rectangle([60, 80, 450, 300], fill=(37, 99, 168))
draw.ellipse([120, 330, 400, 560], fill=(209, 96, 61))

def saved_size(image, fmt, **options):
    buffer = io.BytesIO()
    image.save(buffer, fmt, **options)
    return buffer.tell()

w, h = photo.size
print(f"raw pixels:        {w * h * 3:>8,} bytes")
for name, image in [("photo", photo), ("graphic", graphic)]:
    print(f"{name:<8} PNG:      {saved_size(image, 'PNG', optimize=True):>8,} bytes")
    for q in (90, 50, 10):
print(f"{name:<8} JPEG q{q:<3}: {saved_size(image, 'JPEG', quality=q):>8,} bytes")raw pixels: 921,600 bytes
photo PNG: 452,018 bytes
photo JPEG q90 : 86,089 bytes
photo JPEG q50 : 30,498 bytes
photo JPEG q10 : 12,001 bytes
graphic PNG: 2,281 bytes
graphic JPEG q90 : 13,559 bytes
graphic JPEG q50 : 9,289 bytes
graphic JPEG q10 : 6,745 bytes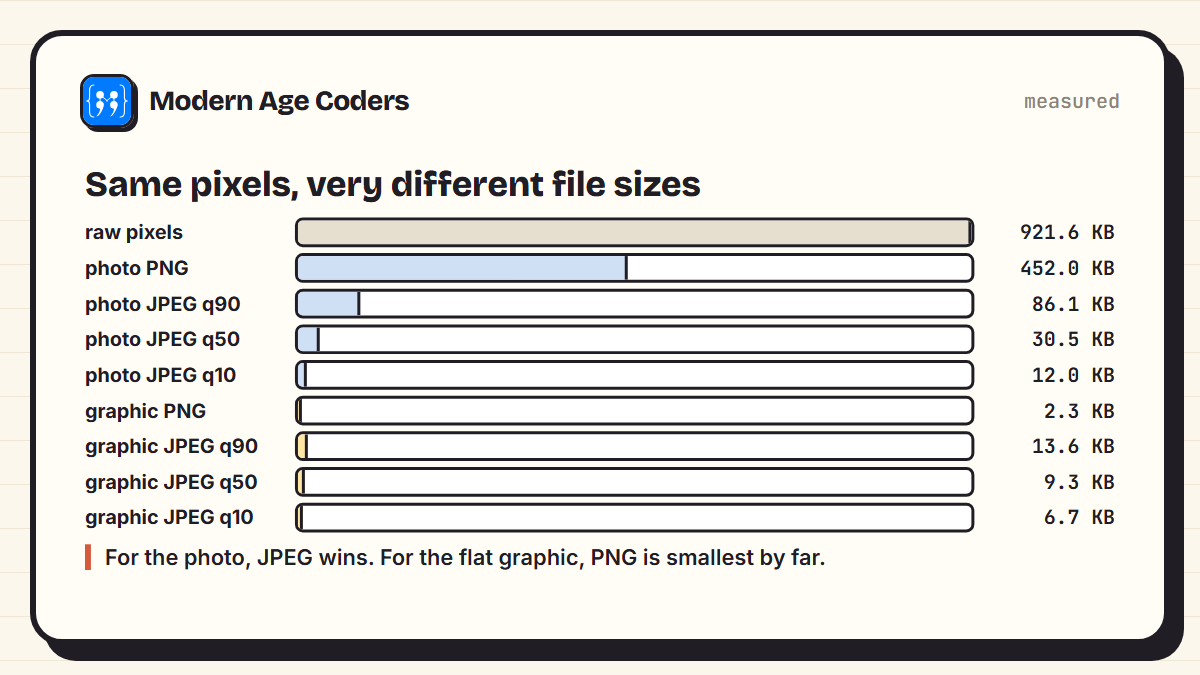
- PNG is lossless. It keeps every pixel exactly, and shrinks files by spotting repeated patterns. The flat graphic has huge areas of identical pixels, so it fell to 2.3 KB. The photo has almost no exact repeats, so PNG only got it to 452.0 KB.
- JPEG is lossy. It throws away detail your eye is unlikely to notice. At quality 90 the photo dropped to 86.1 KB, about a tenth of the raw size. But for the flat graphic, JPEG was worse than PNG (13.6 KB against 2.3 KB), and can blur sharp edges.
Which format should you use?
Photos: JPEG (or the newer WebP). Logos, diagrams, screenshots and anything with sharp edges or text: PNG. That one rule makes websites faster and images crisper.
What lossy compression throws away
Turn JPEG quality right down and you can see its method. JPEG works on blocks of 8 by 8 pixels, keeping the broad shape of each block and discarding fine detail. At quality 10 the whole photo is just 12.0 KB, but the blocks become visible:
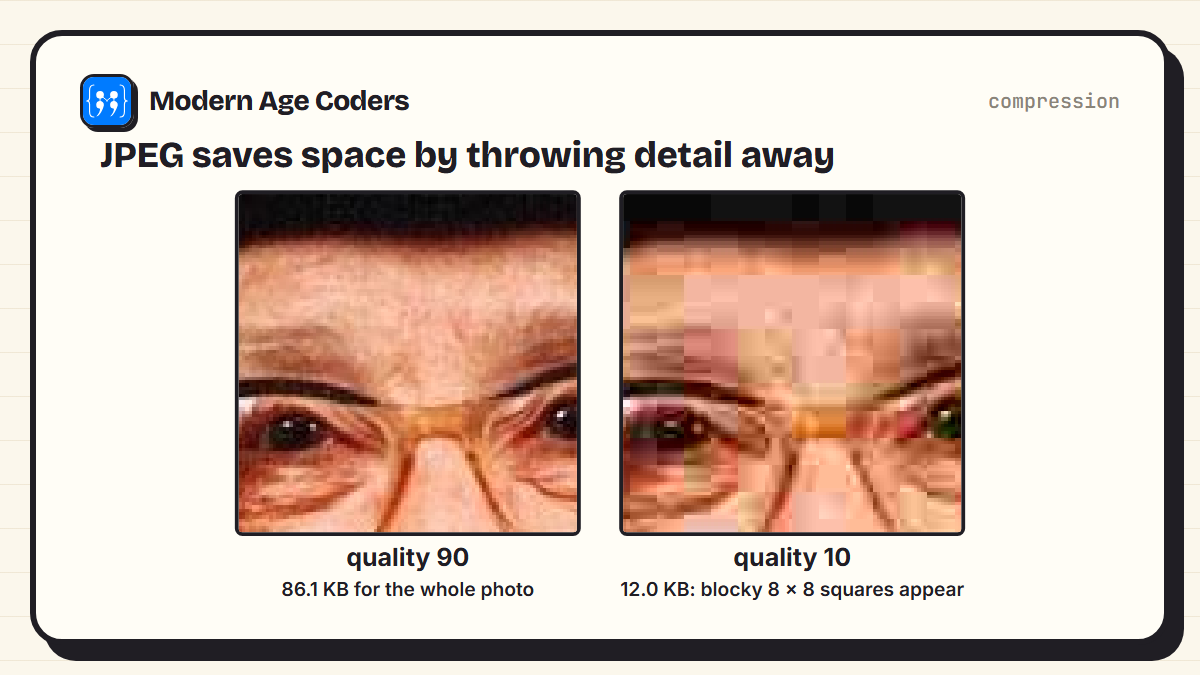
This is also why an image that has been shared, screenshotted and re-saved many times gets steadily worse: each JPEG save throws a little more away. PNG never does, which is why it is the right choice for anything you will edit repeatedly.
Try it yourself
- Install Pillow with
pip install pillowand open any photo of your own withImage.open. - Print its size and a few pixels. Can you find the brightest pixel?
- Turn it greyscale using the formula above, pixel by pixel, then compare with
convert("L"). - Invert the colours: replace each value v with 255 minus v.
- Save it at different JPEG qualities and find the lowest quality where you cannot see a difference.
Projects like this are a great way into programming, because the results are visual and immediate. If you are just starting, our list of basic Python programs builds the skills you need first.
Every image is a grid, every pixel is three numbers, and every photo filter is arithmetic.
How we teach it
Images suit two principles on our how we teach page. Learning by building: a working photo filter, however small, turns pixels and loops into something you can see. And tracing code line by line until every step can be predicted, such as what happens to one pixel in a greyscale loop. Our Python course for teens runs one to one or in small groups of 5 to 10.
Frequently asked questions
As a grid of pixels. Each pixel usually stores three numbers from 0 to 255 for the amount of red, green and blue light. The file format then compresses those numbers, either losslessly like PNG or lossily like JPEG.
A pixel is the smallest square of colour in a digital image. Images are grids of pixels, for example 1920 wide by 1080 tall. From a normal viewing distance your eyes blend them into a smooth picture.
RGB stands for red, green and blue, the three colours of light a screen mixes to make every other colour. Each is stored as a value from 0 to 255, giving over 16.7 million possible colours.
PNG is lossless: it keeps every pixel exactly and is best for graphics, logos and screenshots. JPEG is lossy: it discards detail you are unlikely to notice and is much smaller for photos. In our test the photo was 452 KB as PNG but 86 KB as JPEG at quality 90.
Because an image has a fixed number of pixels. Zooming in makes each pixel cover more of the screen, so the individual squares become visible or the software smooths them into a blur.
A hex code such as #FF8800 writes the red, green and blue values in base 16. Each pair of digits is one value from 00 to FF, which is 0 to 255 in ordinary numbers.
Replace each pixel with a single brightness value. A common formula weights green most and blue least: grey = 0.299 red + 0.587 green + 0.114 blue, which matches how sensitive our eyes are to each colour.